PART 2 Xfce's Panel Profiles app can rearrange your desktop, but getting every layout working properly still takes some manual tinkering. In part 1 of this two-part feature, we covered how to install Xfce's Panel Profiles tool and all the extra plugins it needs for its dozen alternative layouts: macOS, Unity, MATE or GNOME 2, several different Windows-like layouts, and half a dozen different generations of both Xfce and Xubuntu.
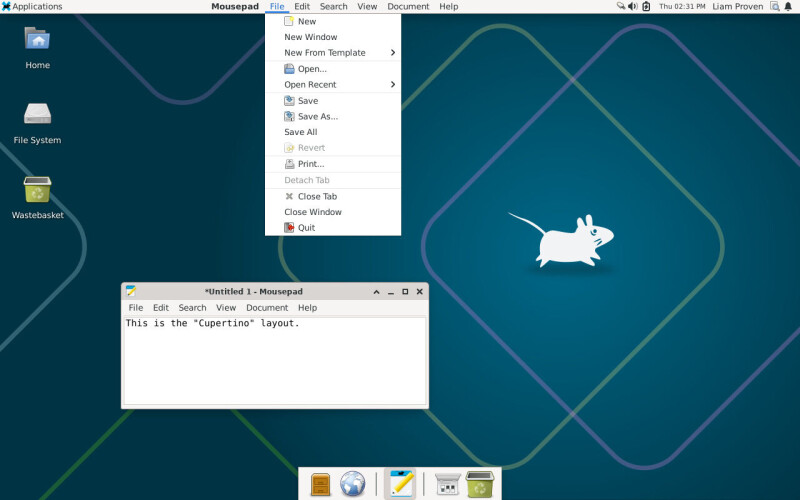
However, as our screenshots showed, the "Cupertino" (Mac-style) and "Unity" layouts are not ideal. For instance, the Unity layout's global menu is immediately followed by the status icons, when they ought to be over on the right. Some of these issues are easy to resolve with the built-in tools, while some need a little more work.
Fixing the menu bar In the Unity layout, it's easy to push the status icons and session controls over to the right, where they belong. Customizing Xfce panels is easy. Choose the panel you want to change, find a blank part of the panel, and right-click it.
Go into the Panel submenu, then click Panel preferences. In the Panel Preferences dialog box, the first two lines are a backup button, then a listbox to choose which panel you're editing. Under those, there's a line of three tabs: Display, Appearance, and Items.
Click on the last tab, Items. This lists all the plugins the panel currently contains, and on the right of the list, there are buttons labeled with up and down arrows to change what order they show in. To fix the Unity panel, we need to add a separator to the top panel, immediately after the appmenu, and set it to Transparent and Expand.
So, click the +Add button at the bottom, and choose "Separator". Use the "up" button to move it up the list until it's directly after "AppMenu Plugin (external)". (Use the down arrow if you overshoot.)
To adjust the separator's own settings, click the button with a wrench below the list – it's directly after +Add and -Remove. Set its Style to Transparent and tick the Expand checkbox. This pushes all the status icons, the clock and so on over to the right end of the panel, which is where we expect to find them.
For the "Cupertino" layout, the fix for the strangely aligned menu is even simpler. Go into the preferences for the top panel, and go to the Items tab. Find the AppMenu plugin.
Click the settings button (with the spanner) at the bottom, and uncheck "Expand". That's all it takes. For a more Mac-like look, we also prefer to hide the label on the Whisker menu: right-click the menu button itself, and pick "Properties".
Go to the second tab, labelled "Appearance", and under the heading "Panel Button", the first entry should be labelled "Display". This should have a list with three options: "Icon", "Title", and "Icon and title." Change it from "Icon and title" to just "Icon," then click the Close button.
Job done. Build a better Dock Both layouts use Xfce's default "Window Buttons" app-switcher in the second, dock-style panel. It doesn't support pinning apps, so you need separate launchers.
That can leave you with duplicated app icons: one to open it, and a second one to show you that it's open, which is redundant. The macOS way to do this is more space-efficient: keep pinned app icons always there, but add an indicator next to the icon to show if it has any open windows. The Docklike Taskbar plugin combines pinned launchers and running-app indicators.
First, install it: sudo apt install -y xfce4-docklike-plugin Then, add it to the panel: right-click the dock-style panel, the one with the app icons. Navigate to Panel -> Panel Preferences -> Items. Remove the Window Buttons plugin, and add the new "Docklike Taskbar" plugin from the list.
Then, use the up-arrow button to the right of the list to move Docklike Taskbar into position. The Docklike Taskbar does what it says on the tin. It combines app launchers and running windows in the same strip of icons.
You can pin app icons to the taskbar, and they stay put whether the app is running or not. If an app is running, it tells you with a colored bar next to the icon. We prefer dashes or macOS-style dots next to the icon instead, which is one of the settings in the plugin's preferences.
Optionally, it can show preview thumbnails for windows. To add apps to the dock, launch them in whatever way you prefer, then right-click the icon and make sure "Pinned to dock" is checked. To remove an icon, right-click it and uncheck the option.
Reordering icons takes a modifier key: hold Ctrl, then left-click and drag an icon to move it. There are alternatives – for example, Debian also includes at least two. On the small side is the simple Plank, which takes about 3.
5 MB. If you want something more gee-whizz, there's also the fancy animated Cairo dock, which takes more like 200 MB, but can use OpenGL-accelerated visual effects and more. (If that's what you want, Xfce may not be the desktop for you, but we won't judge.)
What we like about the Docklike Taskbar plugin is that it's a native Xfce tool: it's as lightweight as the rest of Xfce, and it's configured in the same way as other parts of the desktop. Making the global menu earn its place on the panel You will quickly discover that most apps don't use the global menu, and even if they do, it's duplicated inside the app's own window, which is a waste of screen space.
Getting applications to use the global menu requires some additional configuration. Some of this is described on the Vala panel appmenu project page on GitLab. The instructions are split between two pages, starting with the main README.
Look for the Xfce section. Here, it tells us to type into a terminal window: xfconf-query -c xsettings -p /Gtk/ShellShowsMenubar -n -t bool -s true xfconf-query -c xsettings -p /Gtk/ShellShowsAppmenu -n -t bool -s true Then there are some more on the AppMenu Gtk Module subpage.
Originally published at theregister.com